
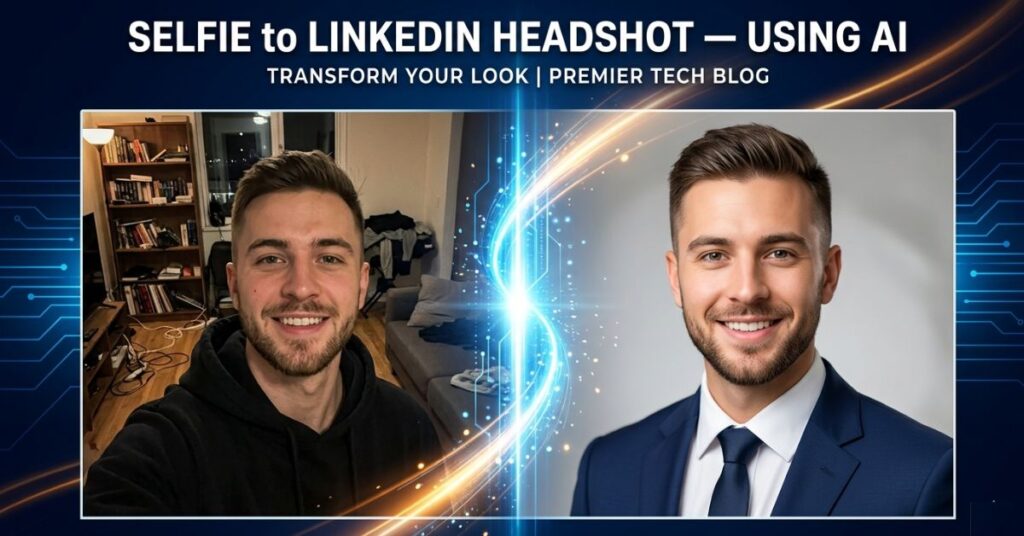
Turn Your Selfie Into a Professional LinkedIn Headshot Using AI
Nobody Tells You That Your LinkedIn Photo Is Making the Decision Before You Do.
There is a strange thing that happens when a recruiter or potential client lands on your LinkedIn profile. They do not start at the top and read down like a document. They glance at your photo, form an opinion in less than a second, and that opinion quietly shapes everything they read after it.
The same job title reads as experienced and credible next to a sharp, well-lit headshot. Next to a blurry party crop or a casual selfie with a cluttered background, that same title reads as someone who has not thought about how they present themselves professionally. The words have not changed. The impression has.
This is not a theory or a LinkedIn marketing claim. It is the documented reality of how people process visual information before engaging with text and it matters whether you are a job seeker, a freelancer trying to win clients or a professional who simply wants to be taken seriously in their field.
The reason this guide exists is that AI has removed every practical barrier to having a professional headshot. You do not need a photographer. You do not need a studio. You do not need to spend money. You need a good selfie, the right prompt and ten minutes and by the end of this guide you will know exactly how to do it properly.
The Insight Most AI Headshot Guides Miss Entirely
Every article about AI headshot tools focuses on comparing the tools. Almost none of them tell you that the tool comparison is the least important part of the process.
Here is what actually happens when most people try AI headshot generators: they take whatever photo is already on their phone, upload it, get a mediocre result, and conclude that the tool does not work well. Then they read a comparison article, switch to a different tool, upload the same bad photo and get a slightly different mediocre result. The photo was the problem, the tool was never the issue.
AI headshot tools work by studying the facial structure, lighting, skin tones, and framing in your source image and generating a professional version based on that data. If the source image is dim, blurry, taken from below, or shows your face at an angle, the AI is not working from solid information. It fills in gaps with guesses and those guesses are what produce the uncanny, slightly-off results that make people think AI headshots look fake.
A sharp, well-lit, front-facing selfie taken in good natural light will outperform a casual photo with bad lighting in virtually every AI tool test. The hardware in your phone is not the limitation, how you use it is.
Get the source photo right first, everything else in this guide follows from that.
Why Your Photo Carries More Weight Than Your Entire Summary
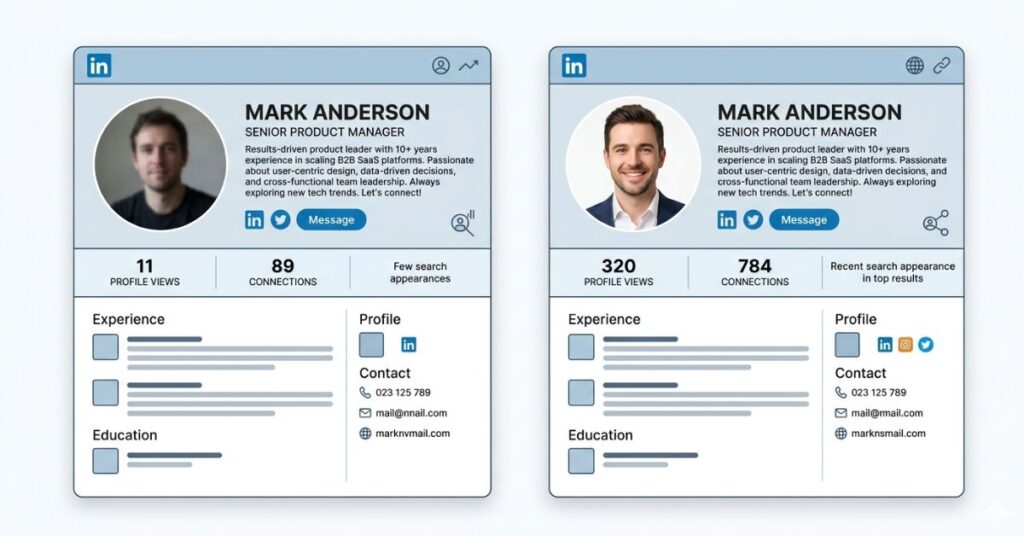
Insight moment 2: Most professionals spend an hour carefully writing and rewriting their LinkedIn summary, and about thirty seconds choosing their profile photo. The time investment is almost exactly backwards from what the evidence suggests it should be.
Eye-tracking research on professional profiles consistently shows that the photo receives the first and often the longest visual attention. It is seen before the name, before the job title, and well before anyone reaches the summary. The impression it creates; competent or careless, approachable or uncertain, professional or casual functions as a filter through which everything else on the profile gets interpreted.
Think about it from the other side. If you were a recruiter reviewing forty profiles in an afternoon and you see a sharp, confident, well-framed headshot next to a name, you are already slightly more inclined to keep reading. If you see a blurry group photo crop or a picture clearly taken at a social event, you have already absorbed a signal about how much this person invests in their professional presence.
The signal is not about appearance. It is about intentionality. A professional headshot communicates that this person has thought carefully about how they present themselves. That is a quiet but meaningful signal in any professional context and it costs nothing to send it correctly with AI.
How to Take a Source Selfie That Actually Works
Do not skip this section by assuming your existing photos will do. Most casual phone photos fail one or more of these criteria and any failure here limits what the AI can produce regardless of which tool you use.
Light your face from the front, not from behind. The single most common mistake is standing with a window or bright light source behind you. This creates a silhouette effect your face goes dark and the background is overexposed. Face the window instead. Let the light fall directly and evenly onto your face. Mid-morning light from a window on a bright but not harshly sunny day is the most flattering natural light available without any equipment at all.
Put the camera at eye level. A phone held below the chin creates upward distortion that no AI tool can fully correct. A camera held too high makes the subject look smaller. Eye level, straight on, prop the phone against something rather than extending your arm at an angle if possible.
Choose a plain, boring background deliberately. A white wall, a plain light-coloured door, a neutral surface these are ideal. Bookshelves look interesting in person but create noisy backgrounds that interfere with edge detection in AI tools, especially around hair. The duller the background, the cleaner and more accurate the AI output.
Frame head and shoulders, not the whole room. Your face should fill a meaningful portion of the frame. A small figure in a wide shot gives the AI very little facial data to work with. Get close enough that your head and shoulders take up most of the screen.
Wear what you would wear to a professional meeting. This is the one that surprises people most, AI tools largely preserve your clothing. They adjust lighting and replace backgrounds, but they are not adding a blazer if you are wearing a hoodie. Dress for the headshot you want before you take the photo not after.
Take eight to ten shots and choose later. A natural, relaxed face or a genuine slight smile almost always looks better than a held expression. Vary slightly between shots and pick the sharpest, best-lit frame afterwards rather than deciding in the moment.
The Tools Worth Using (And One Honest Opinion About Each)
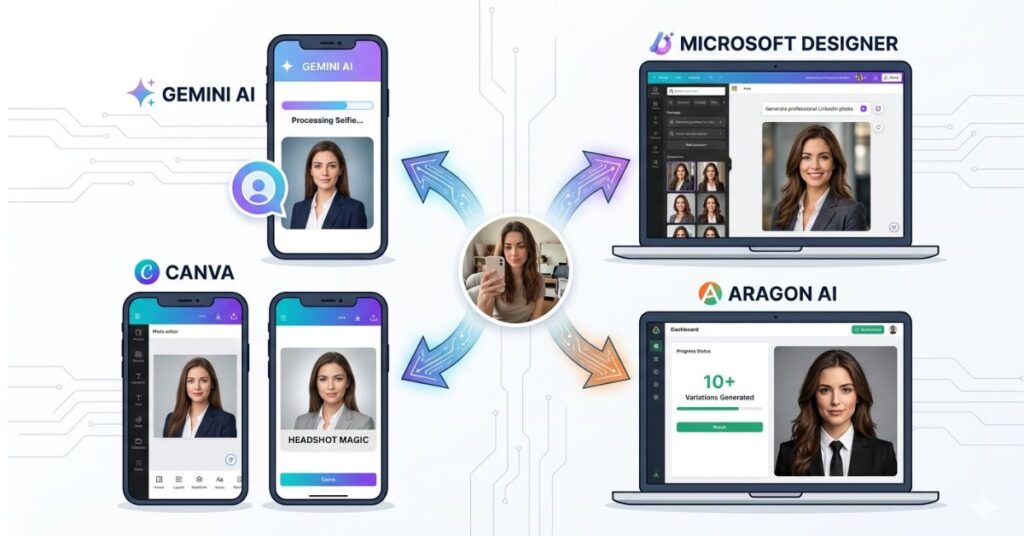
Gemini AI: Free, Flexible and the Best Starting Point
Gemini at gemini.google.com is free with any Google account. Its image generation in 2026 is strong enough for professional headshots when given a clear source photo and a specific prompt. Results vary between generations, so expect to run it two or three times and pick the best output.
Prompt to use:
Transform this photo into a professional LinkedIn headshot. Preserve my exact facial features, skin tone, hair, and appearance without any alteration. Apply clean, soft studio lighting evenly across my face. Replace the background with a neutral light grey gradient. Frame the result as a professional head and shoulders portrait. The final image should look like it was taken in a professional photography studio. Do not change anything about my face or physical appearance only improve the lighting, background and overall professional presentation.
The instruction not to alter your appearance is not optional phrasing. Without it, some generations quietly smooth features or shift skin tones in ways that produce a result that looks like a slightly idealised different person.
Microsoft Designer: The Most Photorealistic Free Option
Available at designer.microsoft.com with a Microsoft account, Designer uses DALL·E under the hood and consistently produces the most photorealistic outputs among free tools. If Gemini results look slightly illustrated or stylized rather than photographic, this is the next tool to try with the same source photo.
Prompt to use:
Professional headshot photograph. Person with [your hair colour] hair, natural appearance, wearing [describe your top]. Soft even studio lighting. Neutral light grey background, slightly blurred. Head and shoulders framing. Natural, approachable expression. High resolution, photorealistic. Do not alter facial features or skin tone.Canva Magic Studio: Best for a Quick Background Fix
Canva is not the strongest tool for full headshot transformation, but it is excellent for one specific scenario: you have a sharp, well-lit selfie that just has a cluttered or unprofessional background. Use Background Remover to strip it out, replace it with a neutral solid colour or professional blur, then run the Enhance tool to sharpen lighting and fine detail. Your actual face stays completely intact throughout. This approach consistently produces the most natural-looking result because it is still your real photo — just cleaned up.
Aragon AI: Worth the Cost in Specific Situations
Aragon at aragon.ai generates 40+ professional headshot variations from a batch of uploaded photos. The output quality and consistency are meaningfully better than free tools, and the results are harder to identify as AI-generated. At around $29 for a one-time batch, it makes sense for a company team page, a senior job application, or a freelance portfolio where a high level of photorealism matters. For a standard LinkedIn profile update, the free tools covered above are entirely sufficient.
Tool Comparison at a Glance
| Tool | Cost | Realism | Ease of Use | Best For |
|---|---|---|---|---|
| Gemini AI | Free | Good | Easy | Quick results, experimentation |
| Microsoft Designer | Free | Very Good | Easy | Photorealistic output |
| Canva Magic Studio | Free (limited) | Moderate | Very Easy | Background replacement only |
| Aragon AI | ~$29 one-time | Excellent | Easy | Multiple professional variations |
| LinkedIn AI (Premium) | Free with Premium | Good | Very Easy | Direct to profile |
Step-by-Step: From Selfie to Published LinkedIn Headshot
Step 1: Find a window with good natural light. Face it directly. Mid-morning on a bright day is ideal.
Step 2: Put on something professional plain, neutral or dark colour, no logos or busy patterns.
Step 3: Set your phone at eye level against a plain wall. Take eight to ten shots varying your expression slightly. Select the sharpest, best-lit one.
Step 4: Open gemini.google.com and sign in with your Google account.
Step 5: Upload your chosen photo using the image icon in the chat input, then paste the Gemini prompt above.
Step 6: Review the output carefully. Does it look like a professional, well-lit version of you or does it look like a noticeably different person? If the face has been altered, regenerate. Run it two or three times before deciding.
Step 7: If Gemini results are not satisfactory after three attempts, take the same source photo to Microsoft Designer and repeat the process there.
Step 8: Once you have a result you are genuinely happy with, professional lighting, clean background and recognizably you. Download it at the highest available resolution.
Step 9: Open LinkedIn, go to your profile, click your current photo and upload the new one. Crop so your face fills roughly 60% of the square frame.
Step 10: While you are there, check that your headline and current role are accurate. A professional photo draws more profile visitors make sure what they find when they arrive reflects the same level of care.
What Actually Matters More Than Which AI Tool You Use
The entire online conversation about AI headshot tools is focused on the wrong question. People compare Gemini versus Aragon versus Designer as though the tool is the primary variable. It is not. The primary variables are the source photo and what you are wearing in it, both of which are entirely within your control before any AI is involved.
Here is something worth being direct about: if you upload a photo where you are wearing a casual t-shirt, standing under fluorescent ceiling lights, with a kitchen counter visible over your shoulder, no AI tool available today is going to produce a convincing professional headshot from that. The tool will try. The output will look processed and slightly artificial. And it will not be the tool’s fault.
The professionals getting genuinely impressive results from free AI tools are not using better tools. They are starting with better source material. Neutral clothing, window light, plain background, front-facing, eye-level camera. Four conditions that are free to meet and that make every tool perform noticeably better.
There is also something most guides skip over about posture and expression. Slouched shoulders communicate uncertainty in a headshot even after AI processing. The tool improves the background not your body language. A held, stiff expression looks like a held, stiff expression at any resolution and in any lighting. These are things you control before you take the photo and they carry more weight in the final result than any prompt or tool setting.
Common Mistakes That Produce Artificial-Looking Results
Uploading a group photo crop. Even a partial second person at the edge of the frame confuses AI edge detection significantly, especially around the face, shoulders and hair. Always start from a solo photo.
Using an old photo because it once looked good. Photos from older devices often lack the resolution that current AI tools need to work cleanly. The blurriness may not be obvious at small display sizes but becomes a real limitation during processing. Always use a fresh photo taken on your current device.
Accepting an output that noticeably changes your face. A headshot that looks like a smoother, more symmetrical, slightly idealised version of you is worse than an imperfect headshot that actually looks like you. When someone meets you after seeing your profile on a video call, at an interview, at a first meeting, the gap between the AI version and your real face creates an immediate trust deficit at exactly the wrong moment.
Adding more edits on top of AI output. If the result looks good, leave it. Running AI output through a filter app, adjusting brightness and contrast manually, adding effects each additional layer makes it look more processed. Clean AI output used directly is almost always better than over-processed AI output.
Forgetting what you are wearing. The AI preserves your clothing. The casual top in your selfie is going into your professional headshot unless you change before you shoot. Dress for it.
When This Actually Starts Hurting You
The impact of a poor LinkedIn photo is one of those things that is difficult to attribute directly but consistent in aggregate.
Recruiters using LinkedIn Recruiter see profile thumbnails in search results before they click through. The photo is visible and being evaluated at thumbnail size before your name has been read. A professional photo increases the likelihood that someone opens your profile. A casual or blurry one decreases it. Over dozens or hundreds of recruiter searches that you are never aware of, that difference quietly accumulates into missed profile views and missed opportunities.
For freelancers and consultants, the effect is more direct. When a potential client is evaluating two or three providers, they visit every profile. A professional headshot communicates that this person invests in how they present themselves, which clients frequently interpret as a proxy for how carefully they approach their work in general. That association is not entirely rational. It is also consistently real.
The most expensive time to fix your LinkedIn photo is after you have already lost opportunities because of it. The least expensive time is now.
What You Should Do
Step 1: Find a window with good natural light in your home or workspace. Face it.
Step 2: Put on something professional; plain, neutral or dark color no logos or heavy patterns.
Step 3: Set your phone at eye level. Take eight to ten shots with slightly varied expressions. Select the sharpest, best-lit one.
Step 4: Open gemini.google.com, upload your chosen photo, and paste the prompt from this guide. Generate two or three versions and choose the best.
Step 5: If Gemini results are not satisfactory, take the same photo to Microsoft Designer and repeat.
Step 6: Download the best result at the highest available resolution.
Step 7: Upload to LinkedIn, crop to head and shoulders with your face filling most of the frame, and save.
Step 8: Update your headline and current role while you are there. A better photo brings more visitors, give them something worth reading when they arrive.
Frequently Asked Questions
Final Thoughts
A photography studio used to be the gatekeeper between a casual selfie and a professional headshot. That gatekeeper is gone. What remains is a straightforward process that most people overcomplicate by focusing on tool comparisons when the real decision is how to take a decent source photo happens before any tool is opened.
The shift worth making is not technical. It is about treating your professional online presence with the same seriousness you bring to your actual professional conduct. Most people would not show up to an important meeting looking unprepared. A five-year-old casual photo on a professional profile is the digital equivalent of exactly that.
A professional headshot does not make you more experienced or more qualified. What it does is make people willing to find out that you are and in a world where first impressions increasingly happen on a screen before they happen in person, that is not a small thing at all.